Chocolate Berry Pavlova

img_44761

When you have had a bad day there is nothing like a slice of my friend Caroline’s yummy chocolate Pavlova to cheer you up. This uses the same method as a regular pavlova but with the addition of cocoa powder instead of cornflour. Make sure you beat the sugar into the egg whites well as failure to do so will cause your pavlova to leak sugar syrup when it is cooking. Enjoy!

For the meringue

6 egg whites

300 grams caster sugar

3 tablespoons cocoa powder (sieved)

1 teaspoon cider vinegar


For the topping

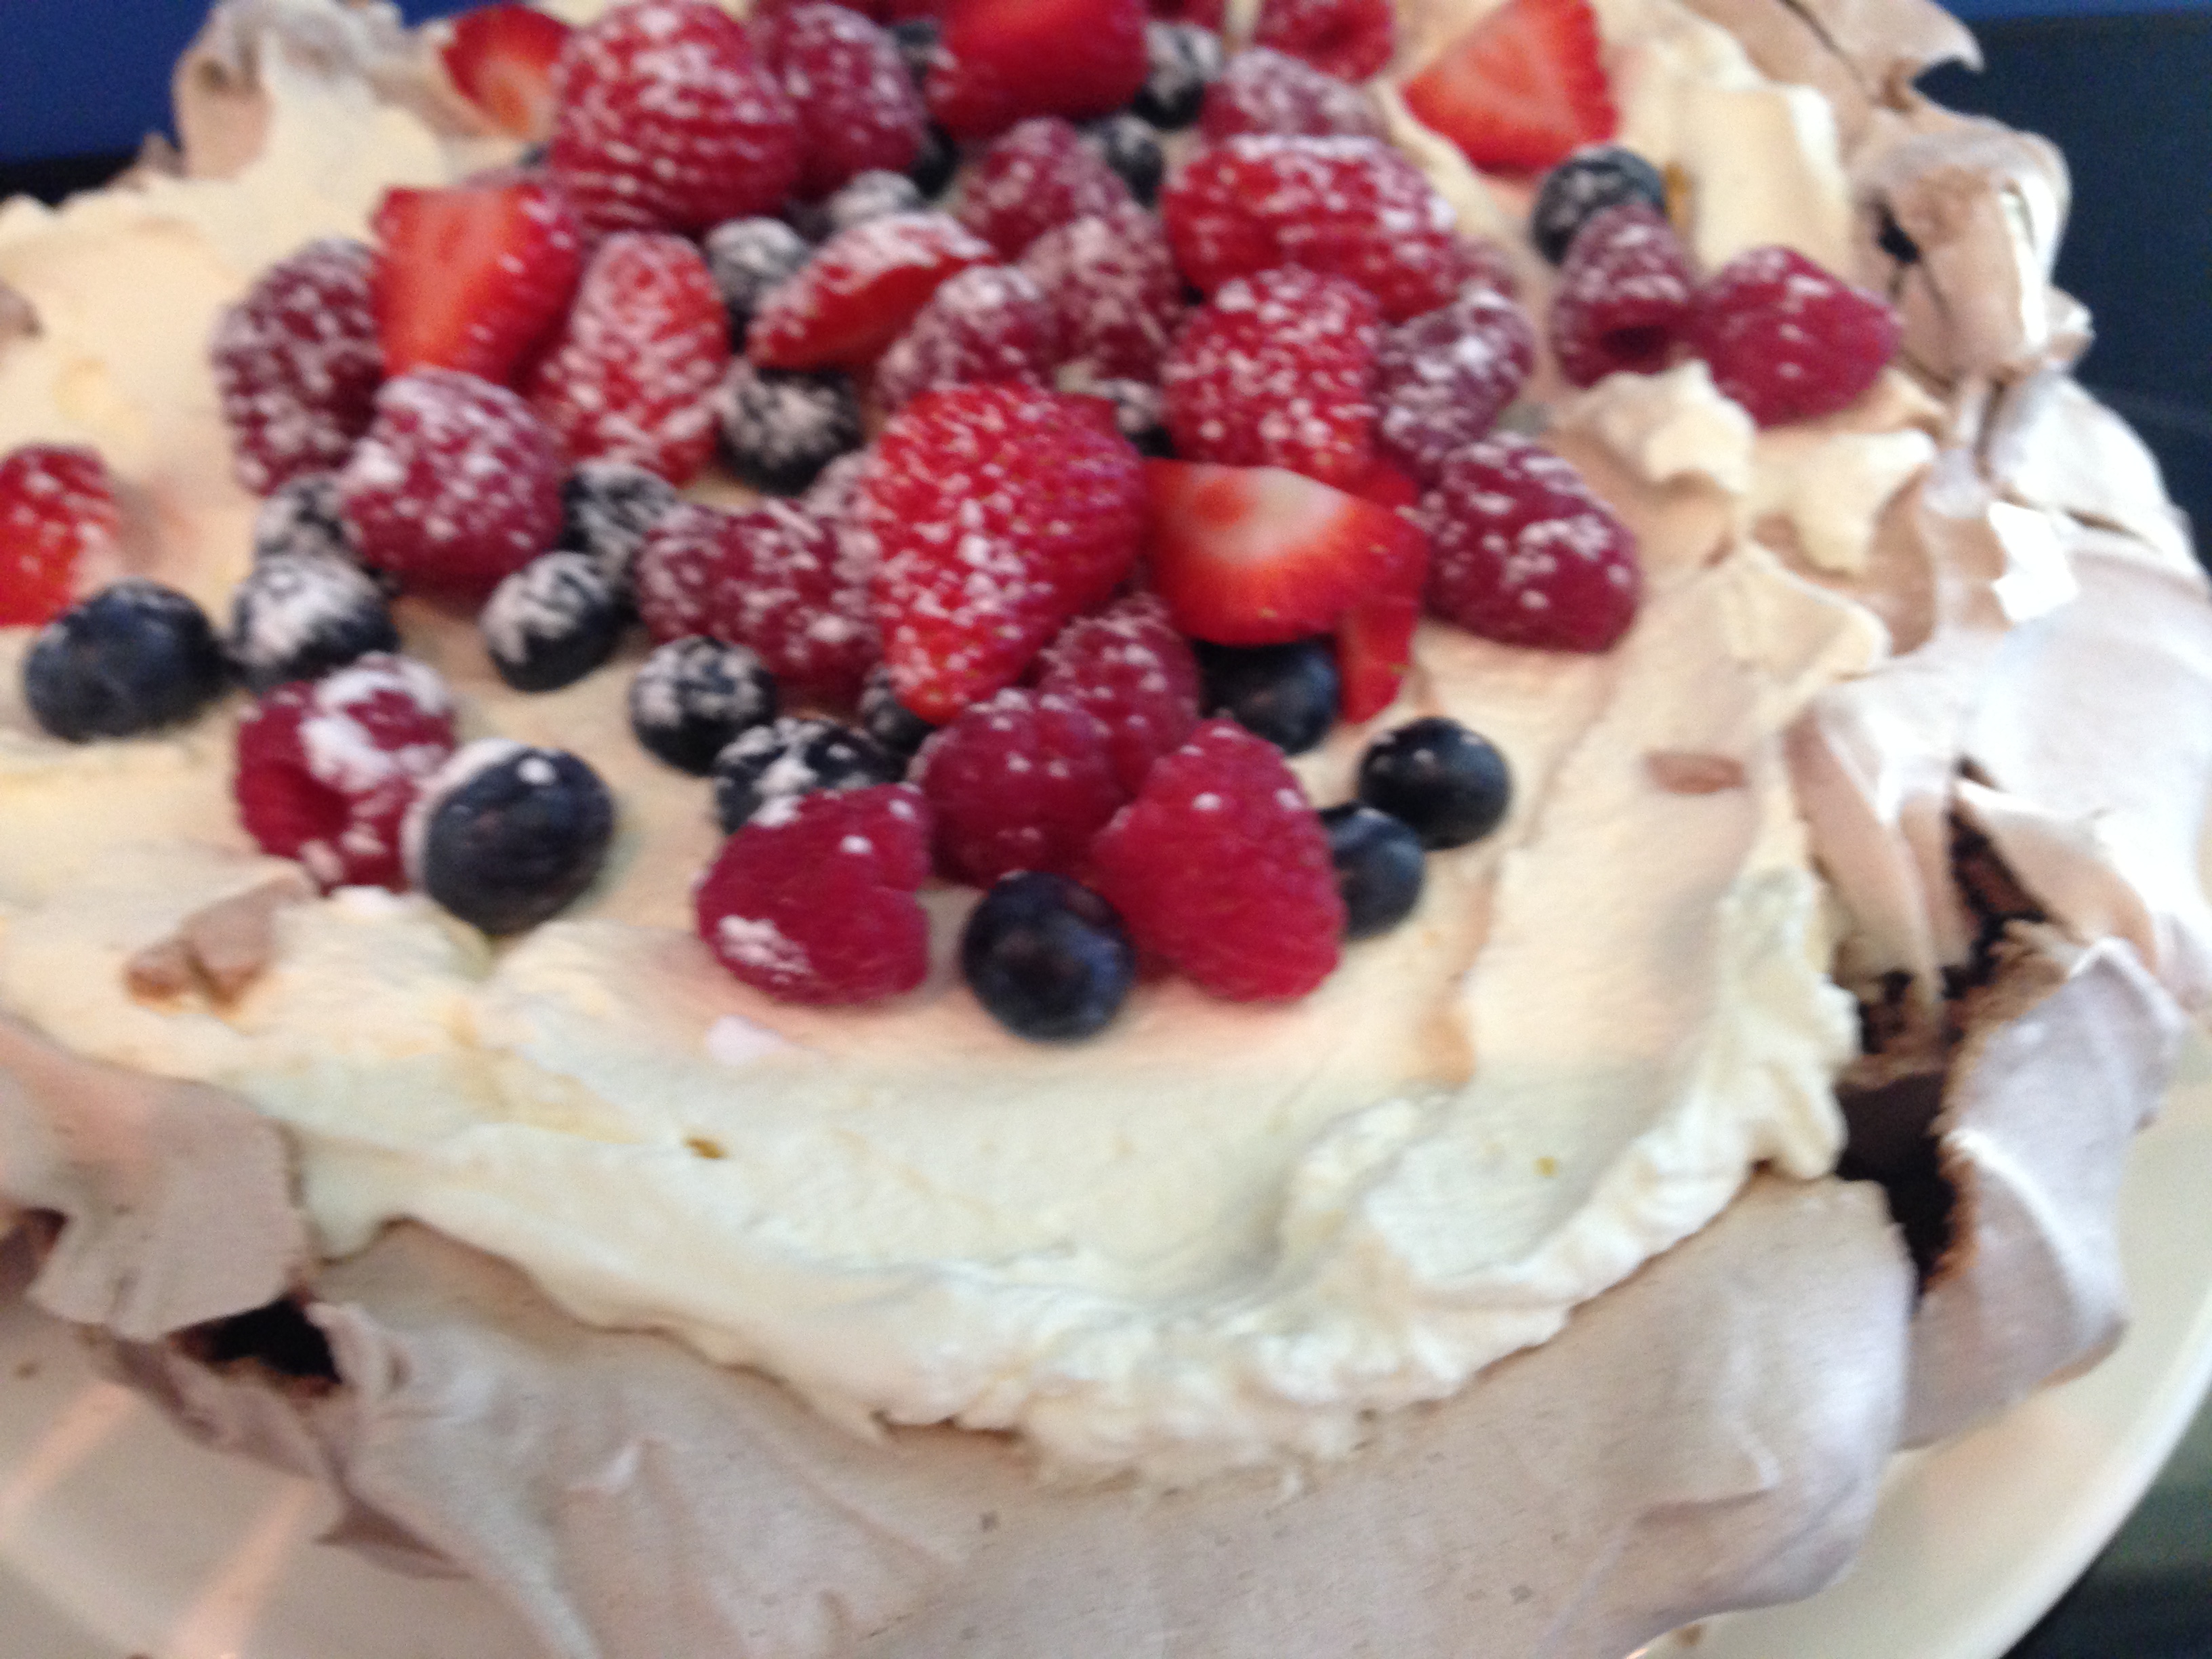
500 millilitres double cream

500 grams raspberries/ blueberries/strawberries

3 tablespoons dark chocolate (coarsely grated)or icing sugar


Method

Preheat the oven to 180°C/gas mark 4/350ºF and line a baking tray with baking parchment.

Beat the egg whites until stiff and you can hold them over your head and then beat in the sugar a spoonful at a time until the meringue is stiff and glossy. Sprinkle over the cocoa and vinegar.

Then gently fold everything until the cocoa is thoroughly mixed in. Mound on to a baking sheet in a fat circle approximately 23cm / 9 inches in diameter, smoothing the sides and top. Place in the oven, then immediately turn the temperature down to 150°C/gas mark 2/300ºF and cook for about one to one and a quarter hours. When it’s ready it should look crisp around the edges and on the sides and be dry on top, but when you prod the centre you should feel the promise of squidginess beneath your fingers. Turn off the oven and open the door slightly, and let the chocolate meringue disc cool completely.

When you’re ready to serve, slide on to a big, flat-bottomed plate. Whisk the cream till thick but still soft and pile it on top of the meringue, then scatter over the berries. Coarsely grate the chocolate so that you get curls rather than rubble and sprinkle  on top. Alternatively dust with icing sugar.

Adapted from Nigella Lawson’s Chocolate Raspberry Pavlova

Chocolate and Zucchini Cake

IMG_4165[1]

The only vegetables my youngest Seán will eat are carrots, so in an attempt to introduce him to other veggies I happened across this recipe with the secret ingredient of zucchini or courgettes as they are known here in Ireland. He is not quite sure what zucchinis are but he knows he doesn’t like courgettes! We call it Maedbh’s Chocolate Cake as my daughter was my co conspirator and helped me bake this. We served it warm with vanilla ice cream and it was a big hit. Seán had two helpings! It even qualifies for the lunchbox, who can argue with the zucchini ingredient!

115 grams/ ½ cup butter

240 grams/ 2 cups plain flour

60 grams/ ½ cup cocoa powder

1 teaspoon bicarbonate of soda/ baking soda

½ teaspoon baking powder

½ teaspoon salt

180 grams/ 1 cup light brown sugar

1 teaspoon vanilla extract

1 teaspoon coffee granules reconstituted in 2 tablespoons boiling water

3 large eggs

350 grams/2 cups unpeeled grated zucchini

160 grams bittersweet chocolate


Preheat oven to 180C/ 350F

Grease and line 20cm springform tin

In a medium bowl, measure out the flour, cocoa powder, baking powder, baking soda and salt and mix with a hand whisk to combine.

In another bowl combine the zucchini, chocolate chips and about one third of the flour mixture making sure the zucchini strands are well coated and not clumping too much.

In the bowl of your mixer, cream the sugar and butter until fluffy. Then, add the eggs, vanilla and coffee mixing well.

Add your flour mixture and mix. The batter will be thick. Then, add the zucchini mixture and with the mixer on a slow speed combine all the ingredients together.

Pour into the cake tin and level the surface.

Bake for 50 minutes until a skewer inserted into the cake comes out cleanly. Allow to cool for 10 minutes in the tin before unclasping the sides of the tin and allowing to cool fully. Serve warm or at room temperature.

Make this cake gluten free by substituting the flour and baking powder with a GF variety. I like Dove’s Farm brand. Remember to include ¼ teaspoon of Xanthan

Adapted from the blog Chocolate and Zucchini

Millionaire’s Shortbread

IMG_3295[1]

This is a very moreish tray bake that people often find challenging because of the palaver with the caramel. You have to be careful that the condensed milk doesn’t burn and cause unsightly burnt flecks in your toffee layer. This recipe is fool proof and I have to thank Josephine Loftus for sharing it with me. I boil at least three cans of condensed milk at the same time so I always have one ready in the cupboard when I want to make this bake. Do remember to label your cans of boiled milk though so you don’t mistake it for regular condensed milk!

For the shortbread:

225 grams / 8 ounces plain flour

175 grams/ 6ounzes cold butter cut into cubes

75 grams /2 ¾ ounces caster sugar

1 tablespoon cold water

For the topping:

1 can of condensed milk boiled for 2 hours in water (I do three at a time!)

155 grams / 5 ½ ounces butter

155 grams / 5 ½ ounces sugar

175 grams / 6 ounces of your favourite chocolate

Method

Firstly, place the condensed milk in a saucepan on top of an upturned saucer to prevent the cans touching the bottom of the pan. Cover with water and bring it to the boil. Time it from when the water reaches boiling point. Avoid letting the water boil off by keeping the water topped up throughout the time. If might seem obvious but use boiling water when topping up. I do this the day before I make the shortbread so that the cans have cooled down.

Heat your oven to 150C / 300F

Then make your shortbread. Combine the flour, sugar and butter into your mixer or food processor and only add the water if the mixture if too dry. It you want to make chocolate orange shortbread add the zest of one orange to the shortbread before the water.

Press the dough into a lined tray with deep sides and cook for approx 18 minutes until a pale brown, if you cook it until it is golden brown it will be hard and unpalatable. Allow to cool.

Melt the sugar and butter in a saucepan over a medium heat until all the sugar crystals have melted. Not waiting for the sugar to melt will create gritty caramel! Then add the cooled can of condensed milk that you boiled for two hours and stir it into the melted sugar and butter. I use a whisk to ensure it is evenly combined. Boil for about four minutes stirring furiously. Make sure it doesn’t catch and burn, if it begins to, turn down the heat. Pour your finished caramel over the shortbread and chill until set.

Melt the chocolate in the microwave in thirty second blasts and pour over the cooled caramel. Consider using an orange chocolate if you have used orange zest in your shortbread. Work quickly as the cold caramel will cause the chocolate to set. I stick it back in the fridge to set but allow it to come to room temperature before serving. Enjoy!

Make the shortbread gluten free by substituting the flour and baking powder with a GF variety. I like Dove’s Farm brand. Remember to include ¼ teaspoon of Xanthum gum. The caramel is gluten free but check that the brand of chocolate you are using is too.

Cheat’s Chocolate Mousse

IMG_3313[1]

This is a tasty desert that is so easy to make but looks very impressive! Instead of the usual fuss with raw egg, this recipe uses marshmallows instead! I’ve served it in chocolate cups but it also works well in a glass with a stem!

150 grams/1 ½ cups mini marshmallows (pink and white ones from Aldi)

50 grams /½ stick soft butter

250 grams/9 ounces/ dark chocolate

60 millilitres/ ¼ cup hot water

280 milliliters/1 cup and 2 tablespoons cream

1 teaspoon vanilla extract

Method

Put the marshmallows, butter, chocolate and water in a heavy based saucepan on a gentle heat to melt the contents. Keep stirring so it won’t burn.

Meanwhile whip the cream with the vanilla until thick, and then fold into the cooling chocolate mixture until totally combined.

Pour into a  bowl and allow to set in the fridge for about two hours.

This mousse is gluten free if you use gluten free marshmallows! It is also good served in glasses or chocolate cups with some cream and fruit on top


Chocolate and Pumpkin Muffins

Not to be defeated by the lack of canned pumpkin purée, here in Ireland I decided to make my home pumpkin purée. I mean how hard it could be? I have many years of puréeing baby food for fussy eaters under my belt! The result was amazing and all those yummy recipes with canned pumpkin were no longer out of my reach! Of course my kids don’t really know there is pumpkin in these muffins we just call them Hallowe’en muffins and they are a big success! The pumpkin spice recipe too is easy to follow and will keep forever. Enjoy!

IMG_3588[1]

Ingredients

218 grams/ 1 ¾ cups plain flour (all purpose)

1 teaspoon baking soda

1 teaspoons cinnamon

½ teaspoon pumpkin spice (recipe follows)

½ teaspoon salt

2 eggs

150 grams/ 3/4 cup sugar

330 grams /1 ½ cups pumpkin purée (recipe follows)

110 grams/ ½ cup brown sugar

125 millilitres /½ cup sunflower oil

125 millilitres/½ cup milk

175 grams/1 cup chocolate chips

Method

  1. Preheat oven to 180°C/350°F.
  2. Mix together the dry ingredients: flour, baking soda, cinnamon, pumpkin spice and salt in a bowl.
  3. In a separate bowl, mix together eggs, sugar, brown sugar, pumpkin puree, vegetable oil and milk until smooth.
  4. Add dry ingredients to wet ingredients and stir until they are combined.
  5. Stir in chocolate chips.
  6. Use muffin liners and using a muffin scoop fill each about 3/4 of the way.
  7. Bake for 18 minutes. Check muffins are cooked when an inserted skewer comes out clean.

Pumpkin Spice

Ingredients:

3 tablespoons ground cinnamon,

2 teaspoons ground ginger,

2 teaspoons ground nutmeg,

1 ½ teaspoons ground allspice

1 teaspoon ground cloves.

Method:

Mix the spices together in a small bowl and Store the mixture in a clean small jar

Adapted from Betty Crocker

Homemade Pumpkin Purée

Ingredients:

1 medium baking pumpkin

Method:

Preheat oven to 180°C/350°F

Place pumpkin on a parchment lined baking sheet and place into oven. Bake until a knife can easily be inserted into the skin of the pumpkin, about 1 hour. If the knife cannot be inserted easily continue baking in 15 minute increments.

Remove the pumpkin from the oven and allow to cool for about 30 minutes.

Slice the pumpkin in half with a knife, and then scoop out the seeds and membrane from the inside of the pumpkin, saving the seeds for roasting if you like.

Scoop out the soft pumpkin flesh with a large spoon and place into blender and purée.

Strain to remove any remaining stringy pieces and store in an airtight container in the refrigerator for up to three days or in the freezer for several months.